ローカル開発環境を手軽に構築できるVagrantの設定をまと…
前回WordPressをLAN内の別のパソコンから確認できるように設定しましたが、これだけだと設置したWordPressからメールが届きません。
メールの動作確認もしたいので、今回はPostfixをインストールしてVagrantに設置したWordPressからメールを送信する方法をまとめていきます。
postfixをインストール
Vagrantにログインして、まずはpostfixをインストールしていきます。
vagrant ssh
sudo apt-get install postfix
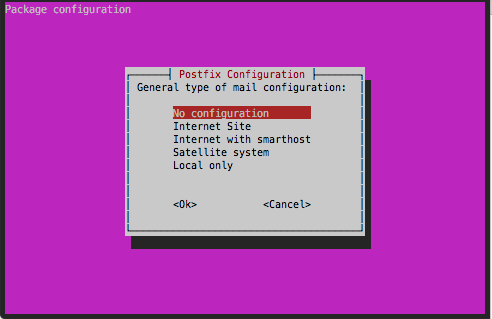
Postfix Configurationの画面が出てくるので、No configrationを選択し、OKします。

SASL2をインストールする
次にsmtp認証を実装するためsaslをインストールします。
sudo apt-get install sasl2-bin
master.cfを編集
次にpostfixのmaster.cfを編集していきます。
sudo vi /etc/postfix/master.cf
master.cfの一番下に記述を追加します。
submission inet n - n - - smtpd
 -o smtpd_sasl_auth_enable=yes
 -o smtpd_etrn_restrictions=reject
main.cfを編集
次にmain.cfを編集していきます。
sudo vi /etc/postfix/main.cf
もしmain.cfが見つからない場合は、以下のコマンドでmain.cf.distをコピーして設定していきます。
sudo cp /usr/share/postfix/main.cf.dist /etc/postfix/main.cf
myhostnameにはメールサーバーのFQDN名を指定します。
mydomainにはドメイン名を指定します。
僕はmyhostnameを「mail.example.jp」mydomainを「example.jp」のように設定しました。
ただしすでに存在するドメインと重複は避けたほうが良いようなので独自ドメインを持たない場合は 「hogehoge」 などピリオドがないドメイン名を指定したほうが良いようです。
default
myhostname = mail.example.com
mydomain = example.jp
次に以下の行を書き換えます。
#inet_interfaces = all
以下のようにコメントアウトし「local」に書き換えます。
inet_interfaces = localhost
mydestinationを以下のように設定。
mydestination = $myhostname,localhost.localdomain, localhost.$mydomain, localhost
各path等が空なので以下のように設定。
sendmail_path = /usr/sbin/sendmail
newaliases_path = /usr/bin/newaliases
mailq_path = /usr/bin/mailq
setgid_group = postdrop
html_directory = no
manpage_directory = /usr/share/man
sample_directory = /etc/postfix
readme_directory = /usr/share/doc/postfix
さらに末尾に以下の記述を追加します。
smtp_sasl_auth_enable = yes
smtp_sasl_password_maps = hash:/etc/postfix/smtp-auth-passwd
smtp_sasl_security_options = noanonymous
smtp_sasl_tls_security_options = noanonymous
smtp_sasl_mechanism_filter = plain
smtp_tls_CApath = /etc/pki/tls/certs/ca-bundle.crt
smtp_use_tls = yes
relayhost = [smtp.gmail.com]:587
smtp-auth-passwdファイル作成
SMTP送信をするための設定ファイルをviで作成していきます。
GmailのSMTPとアカウント名パスワードを設定します。
二段階認証を設定している場合はアプリ固有のパスワードを生成し設定していきましょう。
アプリ固有のパスワードは4文字毎にスペースが入った状態で表示されますが、スペースは不要です。
vi /etc/postfix/smtp-auth-passwd
viで開いたら以下を記述して保存します。アカウント名、パスワードは個別で指定して下さい。
[smtp.gmail.com]:587 Googleアカウント名@gmail.com:パスワード
postfixで認識できるようにハッシュ形式に変換していきます。
sudo postmap /etc/postfix/smtp-auth-passwd
パスワードの情報が記述されているので、smtp-auth-passwdにroot権限がないとアクセスできないように設定していきます。
sudo chown root:root /etc/postfix/smtp-auth-passwd
sudo chmod 600 /etc/postfix/smtp-auth-passwd
sudo chown root:root /etc/postfix/smtp-auth-passwd.db
sudo chmod 600 /etc/postfix/smtp-auth-passwd.db
設定ができたらpostfix再起動します。
sudo service postfix restart
これで、メールが送信されるように設定できました。
設置したWordPressからパスワードの再発行などを行いメールが送信されるか確認してみましょう。
作業中にはまったエラー
うまくいかない時は以下のコマンドでpostfixのログを確認しましょう。
ログにUsername and Password not accepted などとログに記載されてれば、ユーザー名とパスワードの設定が誤っています。
cat /var/log/mail.log
postfix start 時に以下のようなエラーが出る場合は、sendmail_pathを指定してねという意味
string length 0 < 1: sendmail_path =
参考サイト
FQDNなどについては以下のサイトが参考になりました。
Postfix から Gmail 経由でメールを送る
SMTP-AUTHを使って上位メールサーバへ転送する
[wiki.princo.org]
Postfixでsmtp-authの外部smtpにメールをリレーする方法(OP25B対策)
Postfixで、GMAIL経由でメールを送る(OP25B対策)


